


How to Create Multiple Animated Display Ads in Photoshop
How to Create Multiple Animated Display Ads in Photoshop
Adding animation and motion to digital ads is an effective way to generate interest and increase your click-through rate. Plus, it adds a storytelling element to your static ad. If your design process is like mine, where you want all the different sizes of ads in one file so that you can see them all at once, then photoshop is a great program to create and export as gifs.
The following is a breakdown of how to create multiple animated ads:
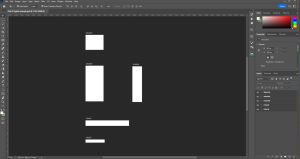
1. Set up your artboards
Use the Artboard Tool to create each size you want, then name them accordingly. Be sure to give yourself enough space around each artboard if you plan to animate anything on or off the ad. If you’ve never worked with multiple artboards in Photoshop before, they function like groups in the Layers Panel on the right.
2. Design one size
Begin by working on the design layout of only one ad size at a time. I like to start with the middle size (300×250 px) and then work bigger and smaller once the design is approved. Design any elements that you plan to use in the entire ad, even if the element won’t appear until later in the animation and move those elements off the artboard. Merge elements that you plan on animating together. For example, I plan on making the button grow and shrink, so I will merge “Get a FREE Session” and the green rectangle into one layer, and name it “Button”.

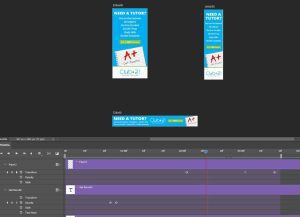
3. Plan your animations
Use the Timeline Panel (under Window) to plan out your animations. Drag the current-time indicator (the red vertical line) to where you want and add a keyframe. You can add a keyframe by first pressing the stopwatch icon to the left of the word for the first keyframe, then the diamond icon after that. Move the current-time indicator and then adjust the element and add another keyframe. In the example below, I am adjusting the transformation of the layer titled “Button”. I want it to loop seamlessly, so I set the first and last keyframes without any transformations and then add in the middle keyframe. Using this technique will help you create an effective animation without learning a whole new program. You can preview the animation by pressing the spacebar.
4. Copy and paste onto the other artboards
Use the Layers Panel to copy and paste the elements onto the other artboards and adjust the layout for each size. If you used the position keyframes, they will have to be redone for its new position for each element. But keyframes for opacity and transformations will carry over, saving you time. You can view all the artboards at once to make sure the animations and designs are consistent. You can also use smart objects and links to easily change out photos across all artboards at once, saving you even more time.
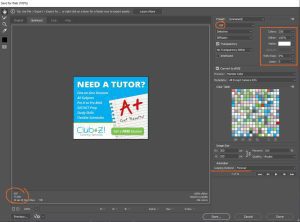
5. Export each artboard as a gif
To export each individual artboard, you will need to hide the visibility of all the other artboards. Do this by clicking the eye icon to the left of the artboard title in the Layers Panel. Next, go to File > Export > Save for Web (Legacy) to open a panel that will export gifs. Most display ads require a size below 150K. The bottom left corner of the preview window will show the estimated file size. To reduce the size, play around with the options on the right, such as colors, dither, web snap, transparency and lossy. Keep the image size the exact size that you need it to be. Under animation, you can choose to loop the gif once or forever and preview the quality with the play button. Once you are happy with the result and file size, press save, name it correctly, and repeat this step for each artboard.
Now your animated ads are complete and ready to be uploaded! Our team at Impact Marketing can do much more than just animate your ads to make your campaign successful. Contact us today to get started at 319-232-4332 or impactmt.com